Dark Chocolate Almond and Date Clusters
almond date clusters-3.jpg

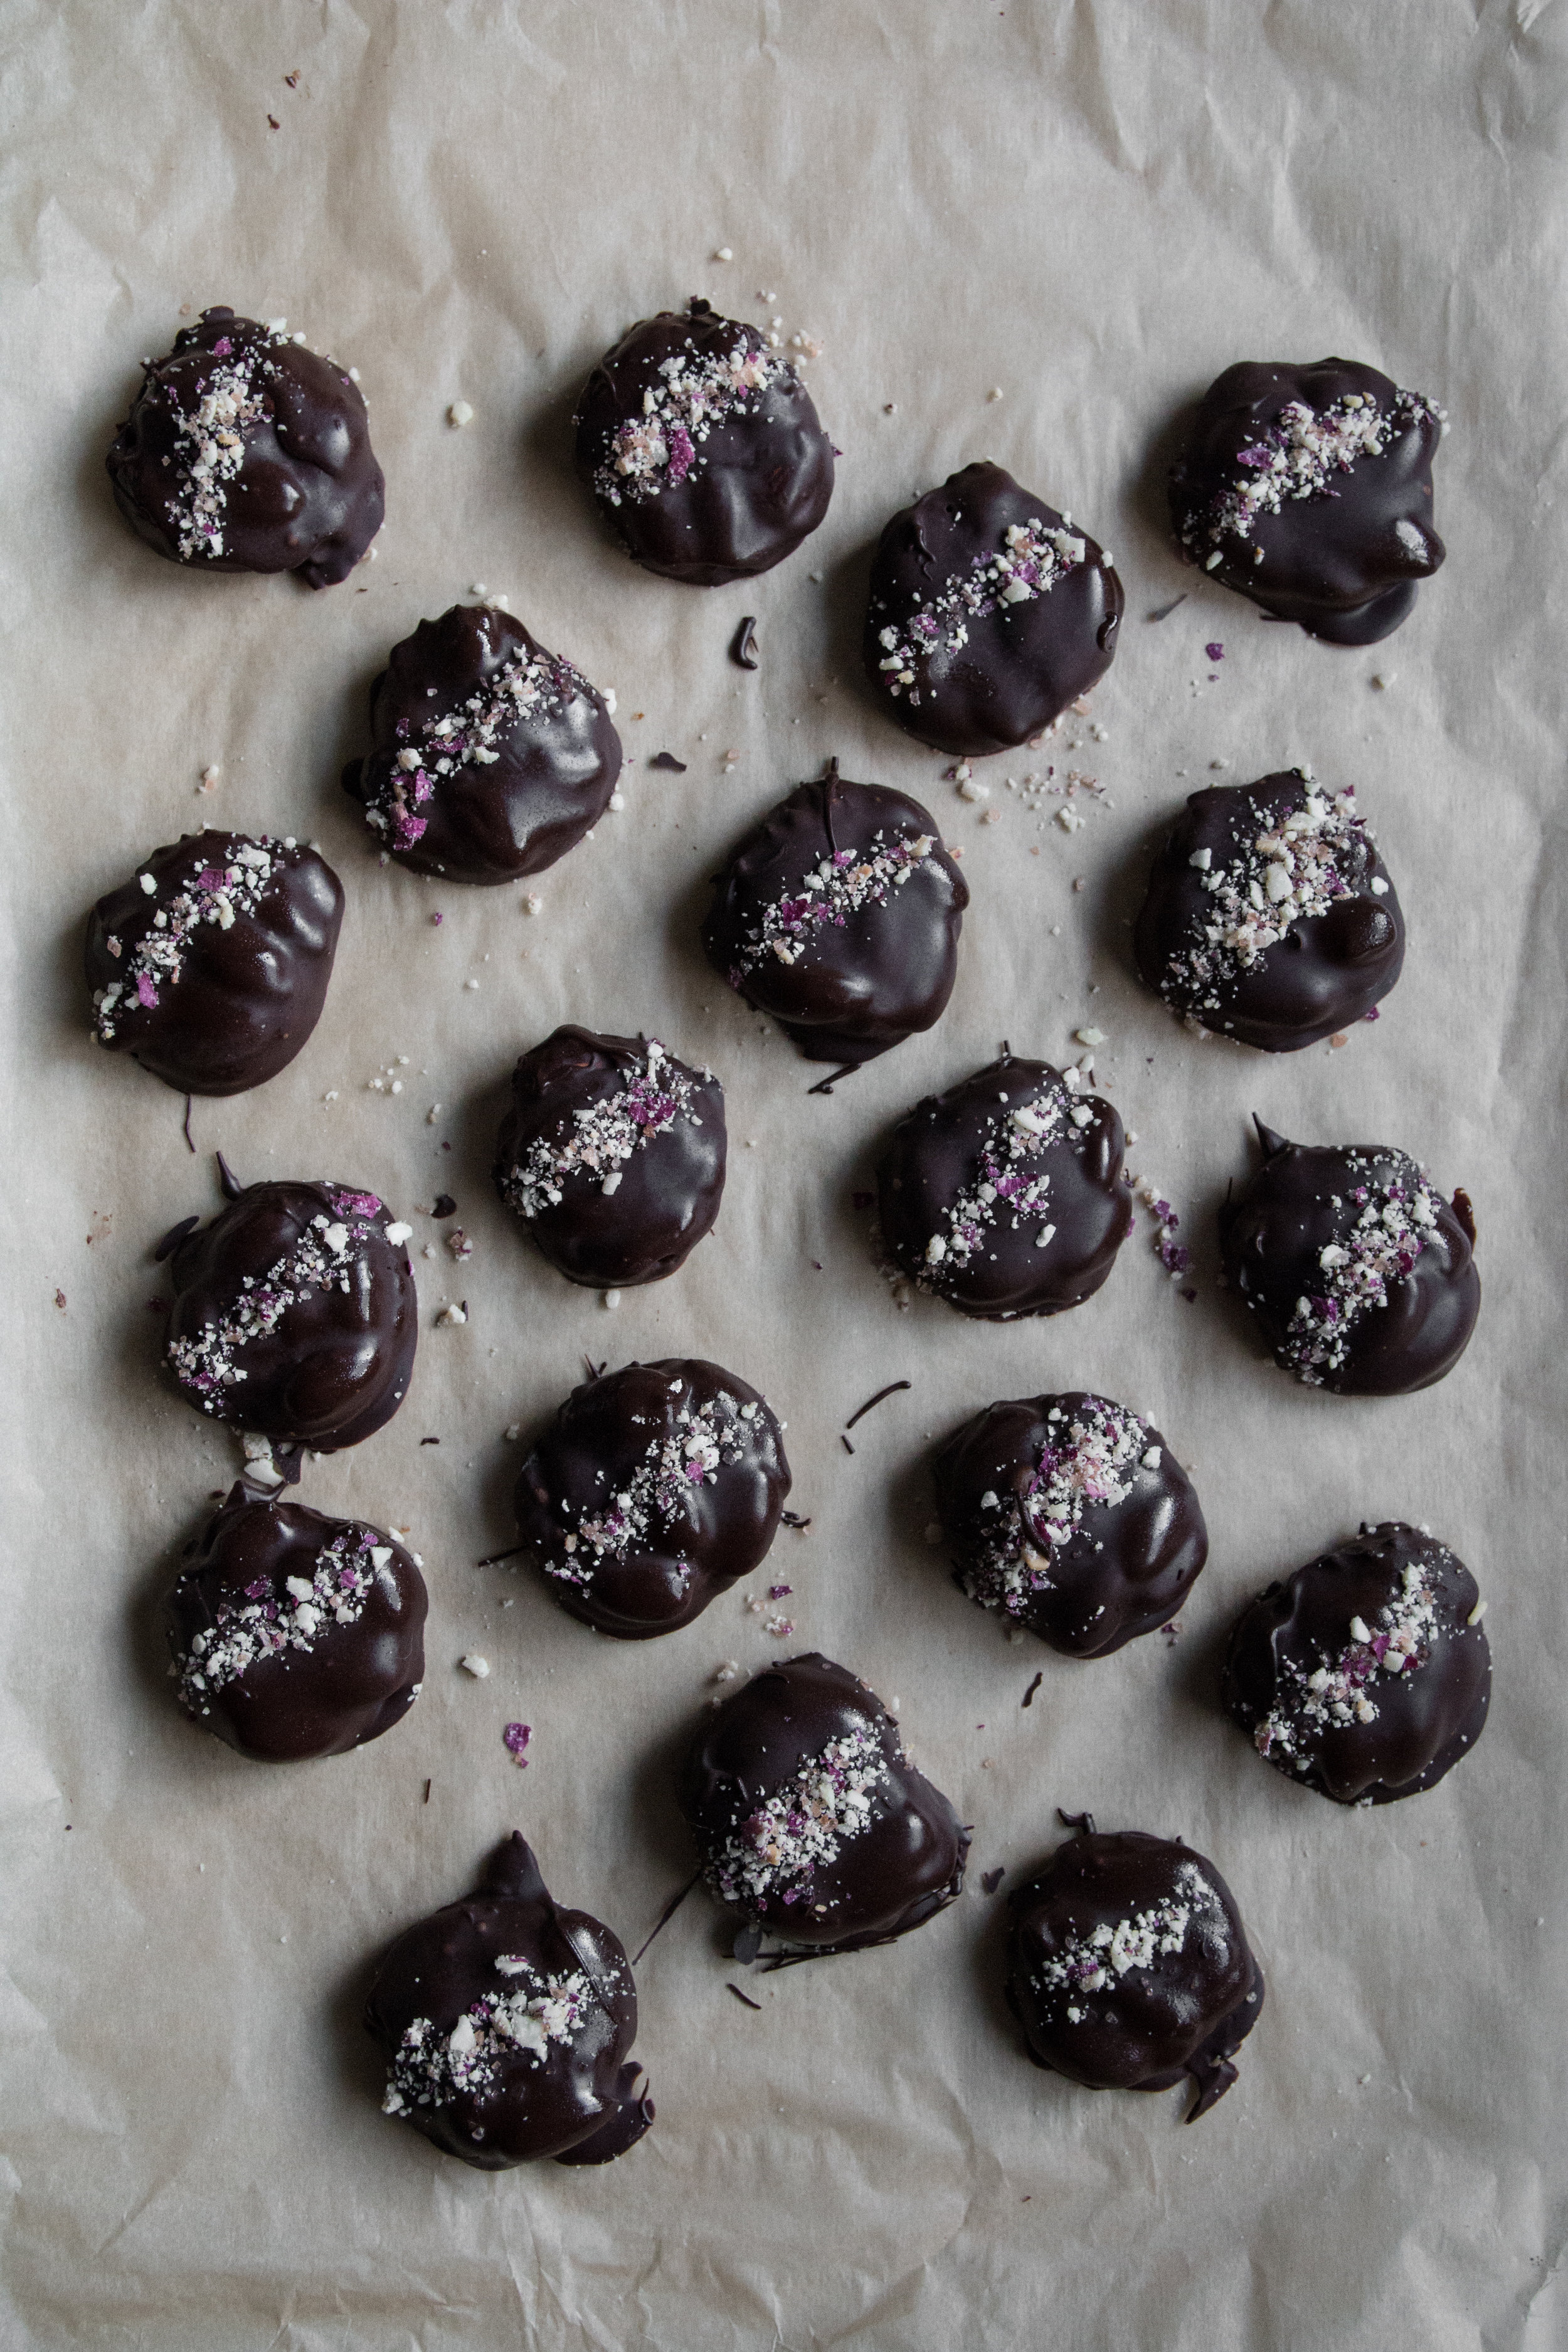
These clusters of almonds and a sweet date filling are all wrapped up in a blanket of rich dark chocolate. They’re rustic little treats, unfussy in form and with a bit of whimsy added by a topping of ground almonds, crushed garden rose petals, and pink salt (optional, of course). As far as chocolates go, these give a nod to healthful eating as the filling is made only of nuts and fruit. Vegan and paleo diets alike approve, but don’t think these are any less dessert worthy as any other chocolate confection; a caramel-like filling with the crunch of almonds to boot make these the very best kind of irresistible.

almond date clusters-19.jpg
almond date clusters-6.jpg
almond date clusters-7.jpg
almond date clusters-11.jpg

Dark Chocolate Almond and Date Clusters

makes about twenty clusters

  • 12 medjool dates, pitted

  • 3 tablespoons salted almond butter

  • 1 teaspoon vanilla

  • 1 cup dark chocolate chips

  • About 1 cup whole roasted almonds, five or six for each chocolate

  • Toppings or decorations (I ground up some slivered almonds, dried rose petals from my garden, and alaea salt together with a mortar and pestle and sprinkled a pinch over each chocolate)

In a food processor, blend the dates, almond butter, and vanilla together until a smooth ball of date paste forms. On a parchment lined baking sheet, divide the date paste into twenty pieces approximately equal in size. Once divided, roll the pieces into balls and place them within even distance of one another.

Press into each ball of date paste five to six whole almonds, flattening the date paste and forming a spherical cluster. Do this for each piece, then place the baking sheet into the freezer for twenty minutes.

When the clusters are chilled and firm, melt the chocolate either in a double boiler or a microwave, stirring every so often to ensure even melting. With a fork, place each cluster into the melted chocolate, coating entirely, then tap off any excess. Place back onto the baking sheet and immediately sprinkle with whatever toppings you have on hand. Do this for each piece, then place them back into the freezer until completely hardened. Keep in the freezer or refrigerator until serving.

Sourdough Pizza Dough
pizza dough-3.jpg

Homemade pizza makes a consistent appearance in my kitchen, be it laden with an array of vegetables or topped with a classic combination of cheese and meat, and I’m always fascinated by new combinations of flavors. This pizza dough is the perfect base for any mélange of ingredients. It’s naturally leavened, meaning it rises with the help of sourdough starter. You can make your own starter if you haven’t tried sourdough baking before or even purchase some online. It may seem a bit daunting at first, but I promise that homemade sourdough pizza is much more forgiving than you think.

Making the dough can be spread out over a number of days if you like, storing it in the fridge in the meantime, allowing you to prep in advance for your next pizza night. I’ve included a few timing suggestions at the bottom of the recipe so you can choose when to make the dough based on what best suits your baking needs.

pizza dough-7.jpg
pizza dough-15.jpg
pizza dough-16.jpg

Sourdough Pizza Dough

makes one large pizza

Step one:

  • 1/2 tablespoon sourdough starter

  • 1/4 cup cool water

  • 1/4 cup plus 2 tablespoons whole wheat flour

Mix the ingredients in a large bowl, cover with plastic wrap or a clean kitchen towel, and set aside for 8 hours to 12 hours.

Step two:

  • Ingredients from step one

  • 1/2 cup lukewarm water

  • 1 1/4 cup plus 2 tablespoons bread flour

  • 1 teaspoon salt

  • Cornmeal, for sprinkling

Mix the ingredients from step one and step two together. It will seem a bit dry at first, but keep kneading until it comes together. Cover the bowl and set aside for 30 minutes. Then, after dipping your hand in some water to keep the dough from sticking to it, pull the edges of the dough over itself in a clockwise fashion until all the edges have been pulled over. Cover again and set aside for another 15 to 30 minutes. Repeat this another three times.

If you want to bake the pizzas in 3 hours or so, allow it to sit at room temperature. If baking the next day or further in advance, place it in the fridge - it will keep for 12 to 48 hours.

After the dough has sat at room temperature for a few hours or in the fridge overnight, take out the dough and place it on a floured surface. Pull the edges into the middle, in four parts, to make a sphere. Flip the dough over, and tighten the top of the dough by pulling it towards you on the floured surface. Allow to rest for an hour or place it back in the fridge to bake the next day.

After resting the dough, gently begin pulling it outwards, not flattening the edges too much so that it can form a nice crust. Continue pulling gently until the dough is as large and as thin as you desire for your pizza. Flour the baking sheet or pizza pan with cornmeal, then set the stretched dough on top. Your pizza is now ready to assemble with toppings.

Timing suggestions:

Option one: Perform step one in the morning, step two in the evening then refrigerate the dough overnight, and bake the pizza the next day.

Option two: Perform step one in the morning, step two in the evening then refrigerate the dough overnight, and bake the pizza two days later.

Option three: Perform step one in the evening, step two in the morning the next day, and bake the pizza that day.

Option four: Perform step one in the evening, step two in the morning the next day, and bake the pizza the day after.

BreadsAdelle RoseComment
Rye Cookie Vanilla Ice Cream
rye cookie and vanilla ice cream-44.jpg

January still has her chilly ways about her, leaving a trail of warming food cravings behind as each day passes. Ice cream during the wintry season isn’t always wanted when there are cold winds blowing outdoors, but this one is an exception. Chewy rye cookies are baked fresh and crumbled in large chunks into a rich vanilla custard, adding more depth than another cookie would impart, more texture than if vanilla was had alone. Though ice cream is always lovely in balmy weather, I’ll take this one on any frosty evening. The vanilla ice cream custard is enriched with egg yolks whisked with hot cream and milk, lending the silkiest of textures. It then needs to be chilled overnight, making that awaited first scoop after churning the next day even more delicious with anticipation. It holds together better and is less like soft serve if allowed to firm up a bit in the freezer after churning, but I wouldn’t blame you if you stole a spoonful or two right out of the bowl.

rye cookie and vanilla ice cream-27.jpg
rye cookie and vanilla ice cream-33.jpg
rye cookie and vanilla ice cream-37.jpg
rye cookie and vanilla ice cream-43.jpg

Rye Cookie Vanilla Ice Cream

For the cookies:

  • 1 1/2 cup dark rye flour

  • 3/4 cup brown sugar

  • 6 tablespoons unsalted butter, melted

  • 1 egg

  • 1 teaspoon vanilla

  • 1/2 teaspoon salt

  • 1/4 teaspoon baking soda

Preheat the oven to 350 degrees.

Whisk together the melted butter, brown sugar, egg and vanilla. Add the salt, baking soda, and flour and stir until combined.

On two parchment lined baking sheets, place small spoonfuls of the dough so that there are about twelve cookies in total. Bake for 12 to 15 minutes. They should seem slightly underdone, not quite dry on the top; they will continue to cook with residual heat after they’ve been taken out and aiming for a chewy texture is key. Allow the cookies to cool completely, then tear into chunks - you should reserve a few cookies whole for snacking later as the ice cream won’t be able to hold all of the cookie pieces from this batch. Set aside the torn cookie pieces in an airtight container until the ice cream recipe notes to fold them into the custard.

For the ice cream:

  • 2 cups heavy cream

  • 1 1/2 cup milk

  • 1/4 teaspoon salt

  • 1/3 cup sugar

  • 1 teaspoon vanilla or vanilla paste

  • 6 egg yolks

In a saucepan over medium heat, whisk together the heavy cream, milk, salt, vanilla and sugar. While the cream is mixture is heating, whisk the egg yolks in a heatproof bowl. When the cream is steaming and has reached a temperature of 175 degrees, scoop 1/3 cup of the hot milk and slowly whisk it into the egg yolks (do not skip this step, as pouring all the milk in at once will cause the eggs to curdle with the rapid temperature change). Continuing to whisk, add another 1/3 cup of the hot milk, then a final 1/3 cup. Finally, pour the remainder of the hot milk mixture into the bowl and whisk until completely combined. Allow to cool, then place in the refrigerator overnight.

After chilling, churn the custard according to your ice cream machine's directions. Remove from the ice cream machine and place in a freezer-safe container, then gently fold in the rye cookie pieces. For a soft serve consistency, serve immediately. To firm the ice cream, allow to freeze for at least 4 hours or overnight, then serve.

Ice CreamAdelle RoseComment
Cardamom Rolls with Medjool Date Filling
IMG_3902.jpg

Over the holidays, I conjured up a recipe for these cardamom rolls after thinking how delicious a sweet roll would be with a medjool date filling. Traditionally, cardamom rolls are usually made with a butter and sugar filling, perhaps even with a dusting more of cardamom inside. Switching the traditional filling for one made with soft, sticky caramel-flavored medjool dates gives these rolls a hint of unexpected flavors, a bit of je ne sais quoi, if you will. Not too sweet but just sweet enough, they’re a delicious treat for a special Saturday breakfast or brunch with hot drinks and good company.


IMG_3903.jpg
IMG_3923.jpg

Cardamom Rolls with Medjool Date Filling

Makes approximately 12 rolls

For the dough:

  • 2 cups milk

  • 2 packets active dry yeast

  • 1 teaspoon vanilla

  • 1 egg

  • 5 3/4 cup all purpose flour

  • 1/2 cup sugar

  • 1 1/2 teaspoons salt

  • 1 tablespoon ground cardamom

  • 1 1/2 cups cold salted butter, cut into 1/2 inch cubes.

For the filling:

  • 15 medjool dates, pitted

  • 3 tablespoons milk

  • Boiling hot water

For the egg wash:

  • 1 egg

  • 1 tablespoon water

  • Sugar, for dusting after the egg wash

Before mixing the dough or making the filling, soften the pitted dates by placing them in a bowl and covering completely with boiled water. Set aside to cool and soften while you do the following:

Combine the milk and yeast in a bowl, stirring to mix until the yeast is completely dissolved. Whisk in the egg, then the vanilla. Add this mixture to the bowl of a stand mixer with a dough hook attachment.

Add the flour, sugar, salt, and cardamom to the mixer’s bowl and knead on the lowest speed for 8 minutes. Add the cubed butter, and continue to mix the dough for 8 minutes or until the butter has combined with the dough. Allow the dough to rest for 20 minutes.

While the dough is resting, make the date filling. Strain the water from the dates and place in a food processor or blender and add the milk. Blend until the dates have turned into a spreadable paste, adding more milk if the mixture looks too thick to easily spread.

After resting, pour the dough out onto a floured surface and roll with a rolling pin into a rectangle shape that is approximately 12 inches by 24 inches. Once rolled, dot the dough with the date paste. Spread with a butter knife or a bench scraper so that the dough is entirely covered.

Fold one third of the dough up and over the middle, then fold the remaining third over the first folded third. The dough should look like a folded letter.

Roll the dough into a square shape approximately 12 inches across each way. Cut strips about 1 inch wide, stretching each piece before wrapping the dough in a circular motion around itself. Place the rolls on a parchment covered baking sheet, giving them space between each roll as they may double in size, and allow to rise for 2 hours or overnight in the refrigerator (if keeping in the fridge to bake the next morning, you must give the dough 1 hour to rise after being taken out of the fridge).

While the dough rises, preheat the oven to 400 degrees.

Whisk together the egg and tablespoon of water and brush each roll with the egg wash. Dust with a bit of sugar, and bake for 12 to 15 minutes or until golden. Serve warm.